theweight
-
Posts
14 -
Joined
-
Last visited
-
Days Won
1
theweight's Achievements
Junior Member (2/5)
8
Reputation
-
Thanks for pointing that out. I will keep an eye on it. Frankly, I lathered it up with so much silicon I'd be surprised if the water ever touches the metal screw. Chances are this will be replaced in a couple years. But you never know...... So, the 2nd leak may have been the worst, based on the amount of calcium. Good to know that. Thanks
-
LOL - Found another leak ! Looks like I got them both under control. For the initial one I made home made plug. I saw online some of those pool winterizing plugs that are made from rubber and shaped like a cone, with a tightening screw on one end. I had some rubber tubing that just about fit inside the broken fitting. I lathered it with some glue and inserted a screw on the open end and it seemed to do the trick. Or, maybe it was the large amount of silicone I enclosed it in - LOL. After I had that under control I took off all the panels and found a similar leak in another blower jet in the reclining section. This was easier as after I cut away the small crack there was still enough room to get the hose clamped onto it. On this second one, there was a lot of white crystalized "gunk" (for lack of a better word). I'm thinking this was an old leak that the previous owner may have fixed with one of those Fix-A-Leak products. Anyway, that's just a guess but I'm not sure what else the "gunk" could be. Anyway, good for now but the tub is 20 years old so hopefully the next one occurs BEFORE winter. Thanks for the advice.
-
My two cents; My one and only spa is about 20 years old. It was given to me about 9 years ago. Before that it was used by a friend of a friend who were getting rid of it for FREE. I paid about 600.00 for a local Pool/Spa guy to move it for me. They had 5 or 6 guys and straps were needed to get it out of a sunken deck. It was delivered. Once I hooked it up I had 1 minor leak (due to the move) that was easily solved. But, I needed new 220 service, another 300 hundred dollars and this was installed by a friend so basically at cost. I'm thinking this may cost more than the tub if you had an electrician do it. So, about 1K to get mine up and running. About a year later I needed a new heater. A year after that a new blower and a year after that a new pump. Now all of these things are normal wear and tear and were only a few hundred bucks total but be advised that chances are you will need them sooner than later. After nine years it needed a new top side (130 bucks) and a few months later a circuit board (this site helped a lot) at about 400 bucks. I'm not the brightest tool in the shed but I was able to replace everything that failed myself at a significant cost savings. If you're not the handy type, figure a lot more for service. How much I can't say as I've always done it myself (or, when it comes to the electrical portion, a good friend). I guess my point is, if you can get it for a few hundred bucks it MAY be worth your while. But, you should consider the moving cost, electrical service (maybe this should not factor in if you were in the market for a new tub anyway) and whether you can fix/replace parts when they fail. The tub is old so something will fail sooner or later. Hope this helps.
-
Also, when I say plug what I mean is inserting something into opening at the end of the broken fitting. The inside diameter of the fitting is smallish and I may be able to glue some type of plastic dowel in or even a slightly larger screw to insert and get to turn a rotation or two. Not the profession fix but perhaps good enough?
-
I see what you mean. Not sure why there is so much there. Most of the fittings look like that for some reason. I guess what I was hoping to find out is if I decide to somehow plug each end, would that be detrimental to the tub operation? Not sure what to plug it with (maybe more silicone, LOL) but if I do take that route I'm thinking that I would just be down one blow hole, so to speak. Since there are a number of them I didn't think it would matter but thought I'd ask.
-
cranbiz - I know what you mean. The picture actually seems to show more area than what is really available to attache a coupling. Maybe it's because it was such as close-up. Really hoping there is a way to simply plug the end and do without that one air blower.
-
Hello again. I got some great input a few weeks back on my LX-15 board and I'm back for more ! I noticed the tub was losing a bit of volume, not much but since I had just replaced the board I've been double checking the connections and I did need to tighten up the pump union. I finally found a nice filter wrench that did the trick. When I was doubling checking things yesterday I noticed some water coming from underneath the tub. It took awhile but I finally traced it to a blower fitting. This is one of the small ones just below or that the lip of the seat. Following the tubing I see it connected to a manifold that ultimately attached to the blower. At first I thought it was the suction intake but that one is way bigger. Anyhow, I may try to get a hose on the end but I'm not sure it will work. I may try to glue the broken piece back on. I was also thinking of just plugging this some how. Not sure I could get a cap on there or if they make them that small. Of course I would need to cap the tubing that would normally connect here. Would that be a bad idea? There are a number of other outlets for the blower which we don't use often (but it does cycle twice a day). Any suggestions on a way to either plug it or attempt repair? Probably a trial and error thing. I was hoping to not have to remove the fitting from the tub, if possible. Thanks.

-
Spa Builders LX-15 Board Questions
theweight replied to theweight's topic in Portable Hot Tubs & Spas
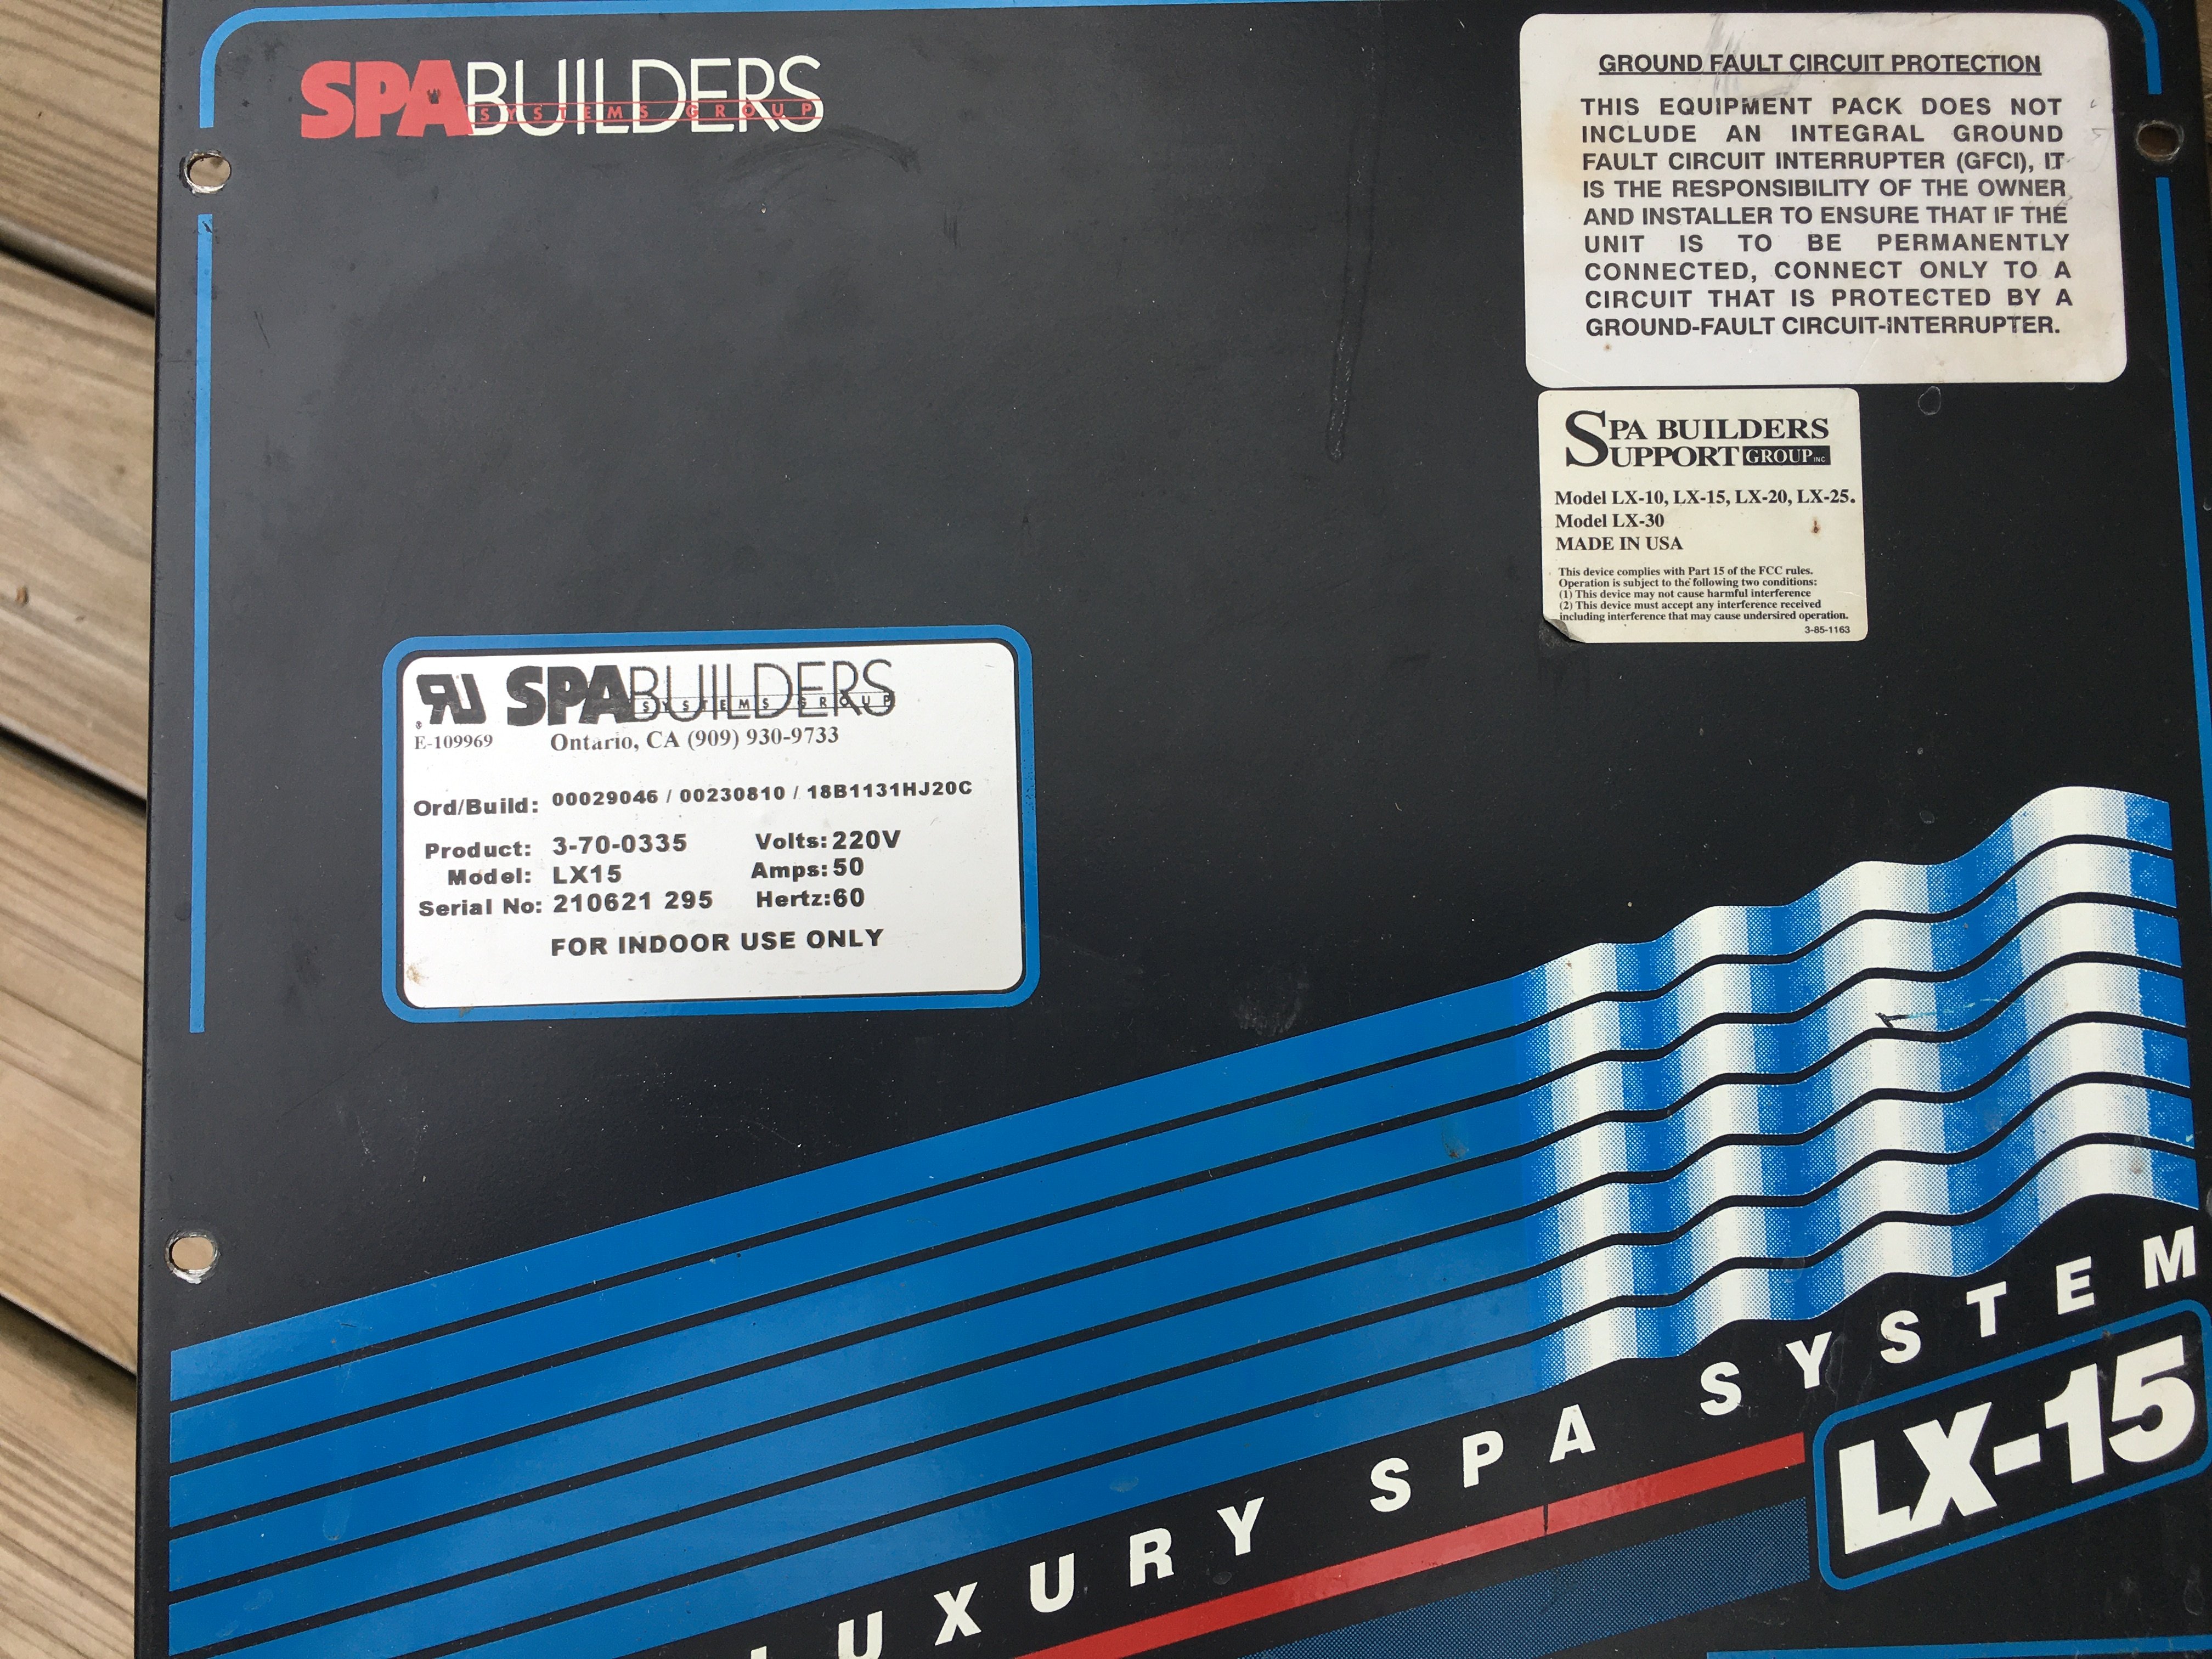
An update on this and just to close this thread out. I checked locally to see if I could find a local guy to help troubleshoot. Most of the local shops have stopped servicing and just do chemicals now. Some will only work on models they sell. One local did track down something similar to the Balboa that RDspaguy recommended. But that was over 800.00 and did NOT include installation. After kicking around Parts vrs new Pack I decided on parts as I had a gut feeling it was the board. I was also concerned about how long it would take for a new pack. Anyway I replaced the board with this: Spa Builders by Allied Innovations - Circuit Board PCB: LX-15 ALPHA REV 5.31 - 3-60-0119 It is basically the same board with the same software version (5.31). Cost was 270.00 US. I also decided to go ahead and replace the Transformer with this: Spa Builders by Allied Innovations - Transformer, LX-10/15 With Plug 220V Systems Basically an upgraded transformer. Cost was 73.00 US. I installed them both and everything is working fine. I was thinking of just installing one or the other to pin point exactly which part was bad but you pretty much need to take it all apart for each piece. Simpler to install them both at the same time. Thanks for everyone who helped out with tips and pointers. The trouble shooting guide provided by CanadianSpaTech was especially helpful. The new board came with the jumpers configured for a 2nd motor (which I don't have), and the guide showed me which ones to set to off. The Boss is Happy !! Thanks Again !! -
Spa Builders LX-15 Board Questions
theweight replied to theweight's topic in Portable Hot Tubs & Spas
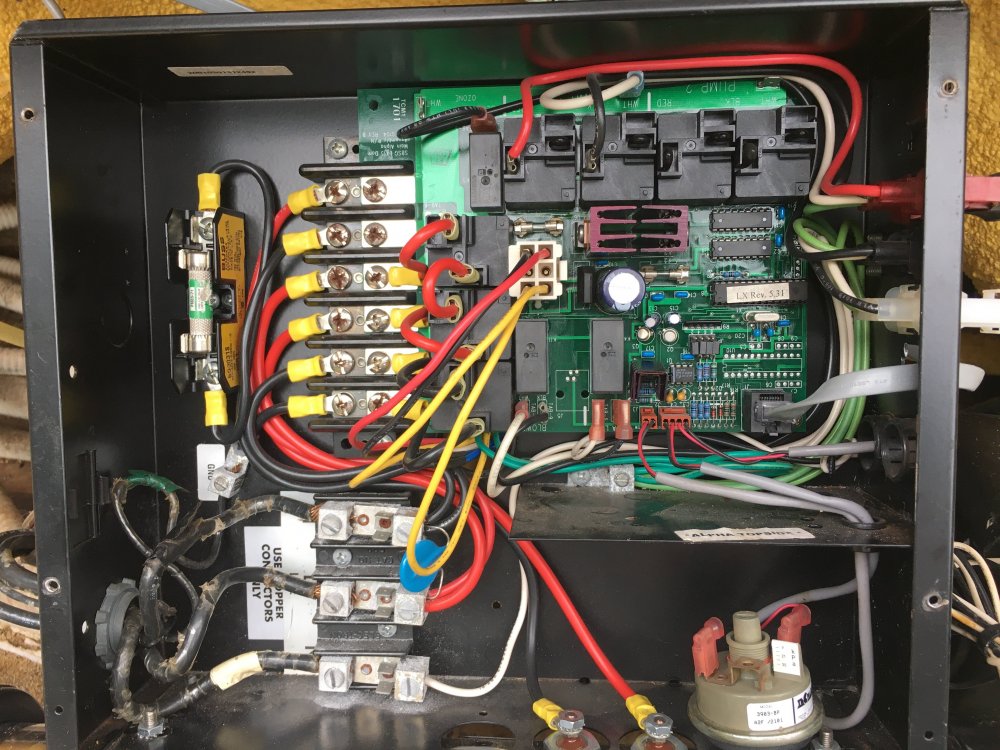
Thanks for hanging in there with me. My electrician friend has confirmed power in. I just say it wrong 😔 240 coming into the panel. confirmed by probe checking the posts 110 also confirmed by checking the neutral. Fuses confirmed as all have continuity. Strange readings on black/red wires on transformer (jumping from 40 to 90 volts). Little or no output on the yellow wires. I had all other wires disconnected (pump, blower, heater, pressure, top side, etc). At this point and due to the age of the enclosure (there is some minor oxidation) I think I may just replace the entire spa pack. Any suggestions? -
Spa Builders LX-15 Board Questions
theweight replied to theweight's topic in Portable Hot Tubs & Spas
Incoming voltage was 220. This was confirmed several times. All good with the incoming supply. We tested the 2 yellow plugs on the Transformer and when we saw little or no output we were leaning to the transformer (based on trouble shooting guide that CanadianSpaTech linked to). Now that guide didn't really say to check the red and black wires which we considered input to the transformer but we decided to check them anyway. Maybe that was incorrect to check them but we did anyway These are the black and red wires on the white plug near the middle of board. We expected to see 220, but we got readings that bounced between 40 and 90. Now, maybe that's correct for this board. Again, the trouble shooting guide did not mention these black and red wires. But, definitely not the right voltage coming out from the yellow wires but maybe that's because the right voltage is not going in via the black and red wires. -
Spa Builders LX-15 Board Questions
theweight replied to theweight's topic in Portable Hot Tubs & Spas
-
Spa Builders LX-15 Board Questions
theweight replied to theweight's topic in Portable Hot Tubs & Spas
RDspaguy - thanks for your reply. I did find some more info on the models and you are correct that they are generic (sort of). My board (ending in -0104) was the first iteration and used a software version of 1.3x (can't remember exactly). A subsequent board (ending in -0119) was made with a newer EPROM chip which contained the 5.31 software. Still another (ending in -0165) was also made with the 5.31 software but also allowed for an Extended cord of up to 50 feet (some top sides had this - not sure why) At least that's how it was explained to me from an online tech. In addition, for folks like me that had the original board, you can add the 5.31 software by swapping out the old EPROM chip with the newer software, which is what was done to my board. Basically, the 5.31 software allowed more functionality with top side displays and seems to be the current one. So, I'm good to use the later boards as long as they have the 5.31 Chip/software as my top side is built for that software version. But, I will test the voltage on the transformer as per CanadianSpaTech suggestion before I order a new board. Might be a day or two but I will report back.... -
Spa Builders LX-15 Board Questions
theweight replied to theweight's topic in Portable Hot Tubs & Spas
CanadianSpaTech - thanks for the reply. We were pretty sure it's the board which is why I asked about the model numbers. But, as I read your post to the manual, I don't remember checking the transformer voltage. I think we just checked it for continuity. The fuses did check out and the power coming in was verified. There is no display on the top side. So power in but nothing runs. 6 months ago I replaced the top side. Intermittent display issues, buttons not working, ect. We unplugged the top side while waiting for the new one to arrive and noticed the spa ran fine. I believe it simply used it's default settings (100 degrees, 2 or 4 cycles etc). Now, with the top side unplugged (old telephone style - like a Cat5 cable) the unit does not run. We will go back and check the transformer voltage. Thanks for posting that link to the manual. Gut feeling is the board but a transformer is a lot cheaper. Keep you posted.. -
Taking a shot to see if anyone is familiar with this old board. Did some trouble shooting and after ruling out components feel that the board is bad (no power). Board is Circa 2001. The board is in a Spa Builders LX-15 box and is marked 3-60-0104 and has a software (EPROM) chip marked 5.31. The 5.31 was important because when I replaced my top side I needed one that would work with that software version as they didn't make top sides for the older 1.3x software. I think these units were known as Len Gordon. Now, I have found several boards online that look exactly like my board. The pictures even show the 3-60-0104 number. However, the listing always show a different part number of 3-60-0165 (or some other numbers for the last 4). It's possible the pictures are generic and no one I've contacted is willing to say for sure whether the slightly different model number would work or even if their pic is generic (at least not yet anyway). Of course, since it's a PCB board no one will accept a return. Anyone out there familiar with these units that knows whether the boards with a higher number would work? If I hadn't just replaced the top side 6 months ago I may have just replaced the whole package right away. But I figured if this board lasted 20 years it must have been good quality. I know if's a long shot but since it's summer I've got some time before the boss gets on my case so I thought I'd check around longer. There seem to be many Spa Pack Replacement kits out there and I'm sure I'd find one to retrofit. Thanks