valvashon
-
Posts
9 -
Joined
-
Last visited
Everything posted by valvashon
-
2004 Sundance Altamar 850- Jet back removal help needed
valvashon replied to valvashon's topic in Portable Hot Tubs & Spas
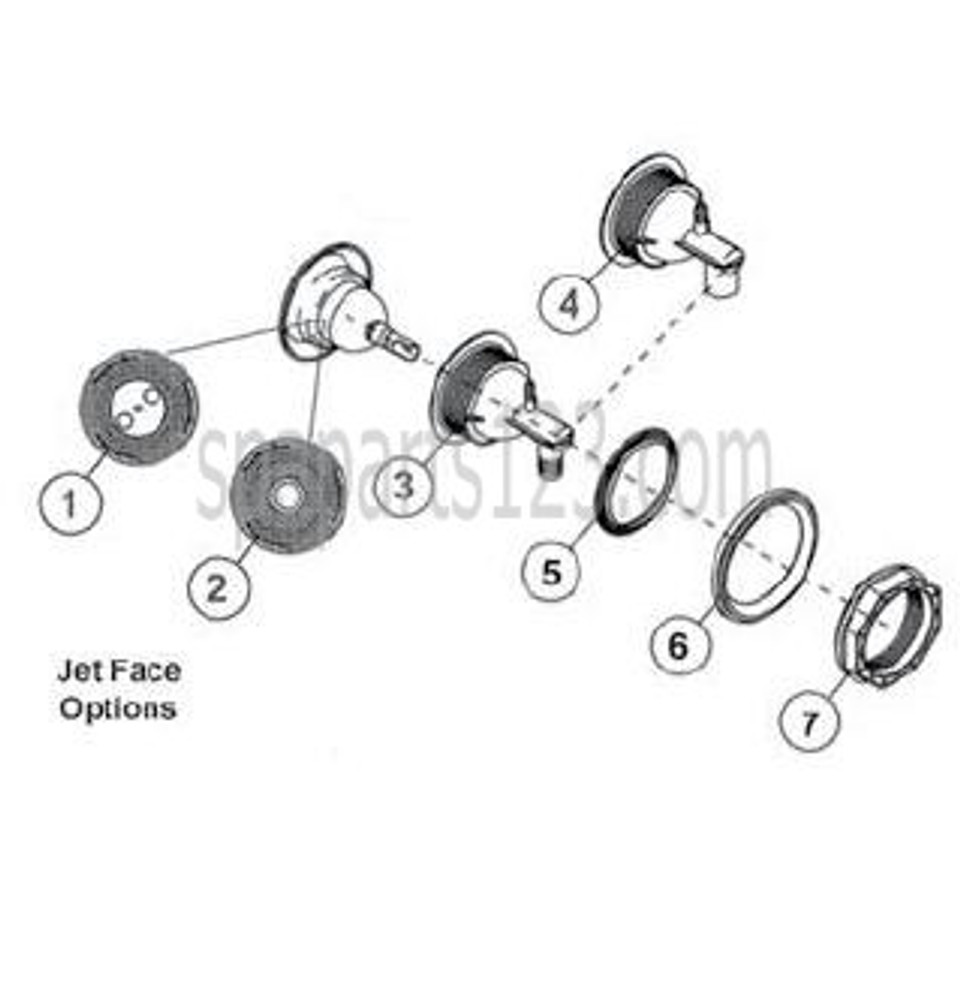
Used a chain wrench (the cheap one on eBay with the green handle) to finally get the large nut off. The chain itself is sort of too big to fit around there nicely but I was able to make it work. This particular chain wrench has chain the size of motorcycle chain back when that was a thing but I really wanted a chain wrench with bicycle sized chain. If anybody knows of a chain wrench with smaller chain share it here. This did work really well to turn this big nut. And the gasket is still available! Sundance part number 6541-078. All of $5! I will make a separate post if/when I get it back together and have it not leak! -
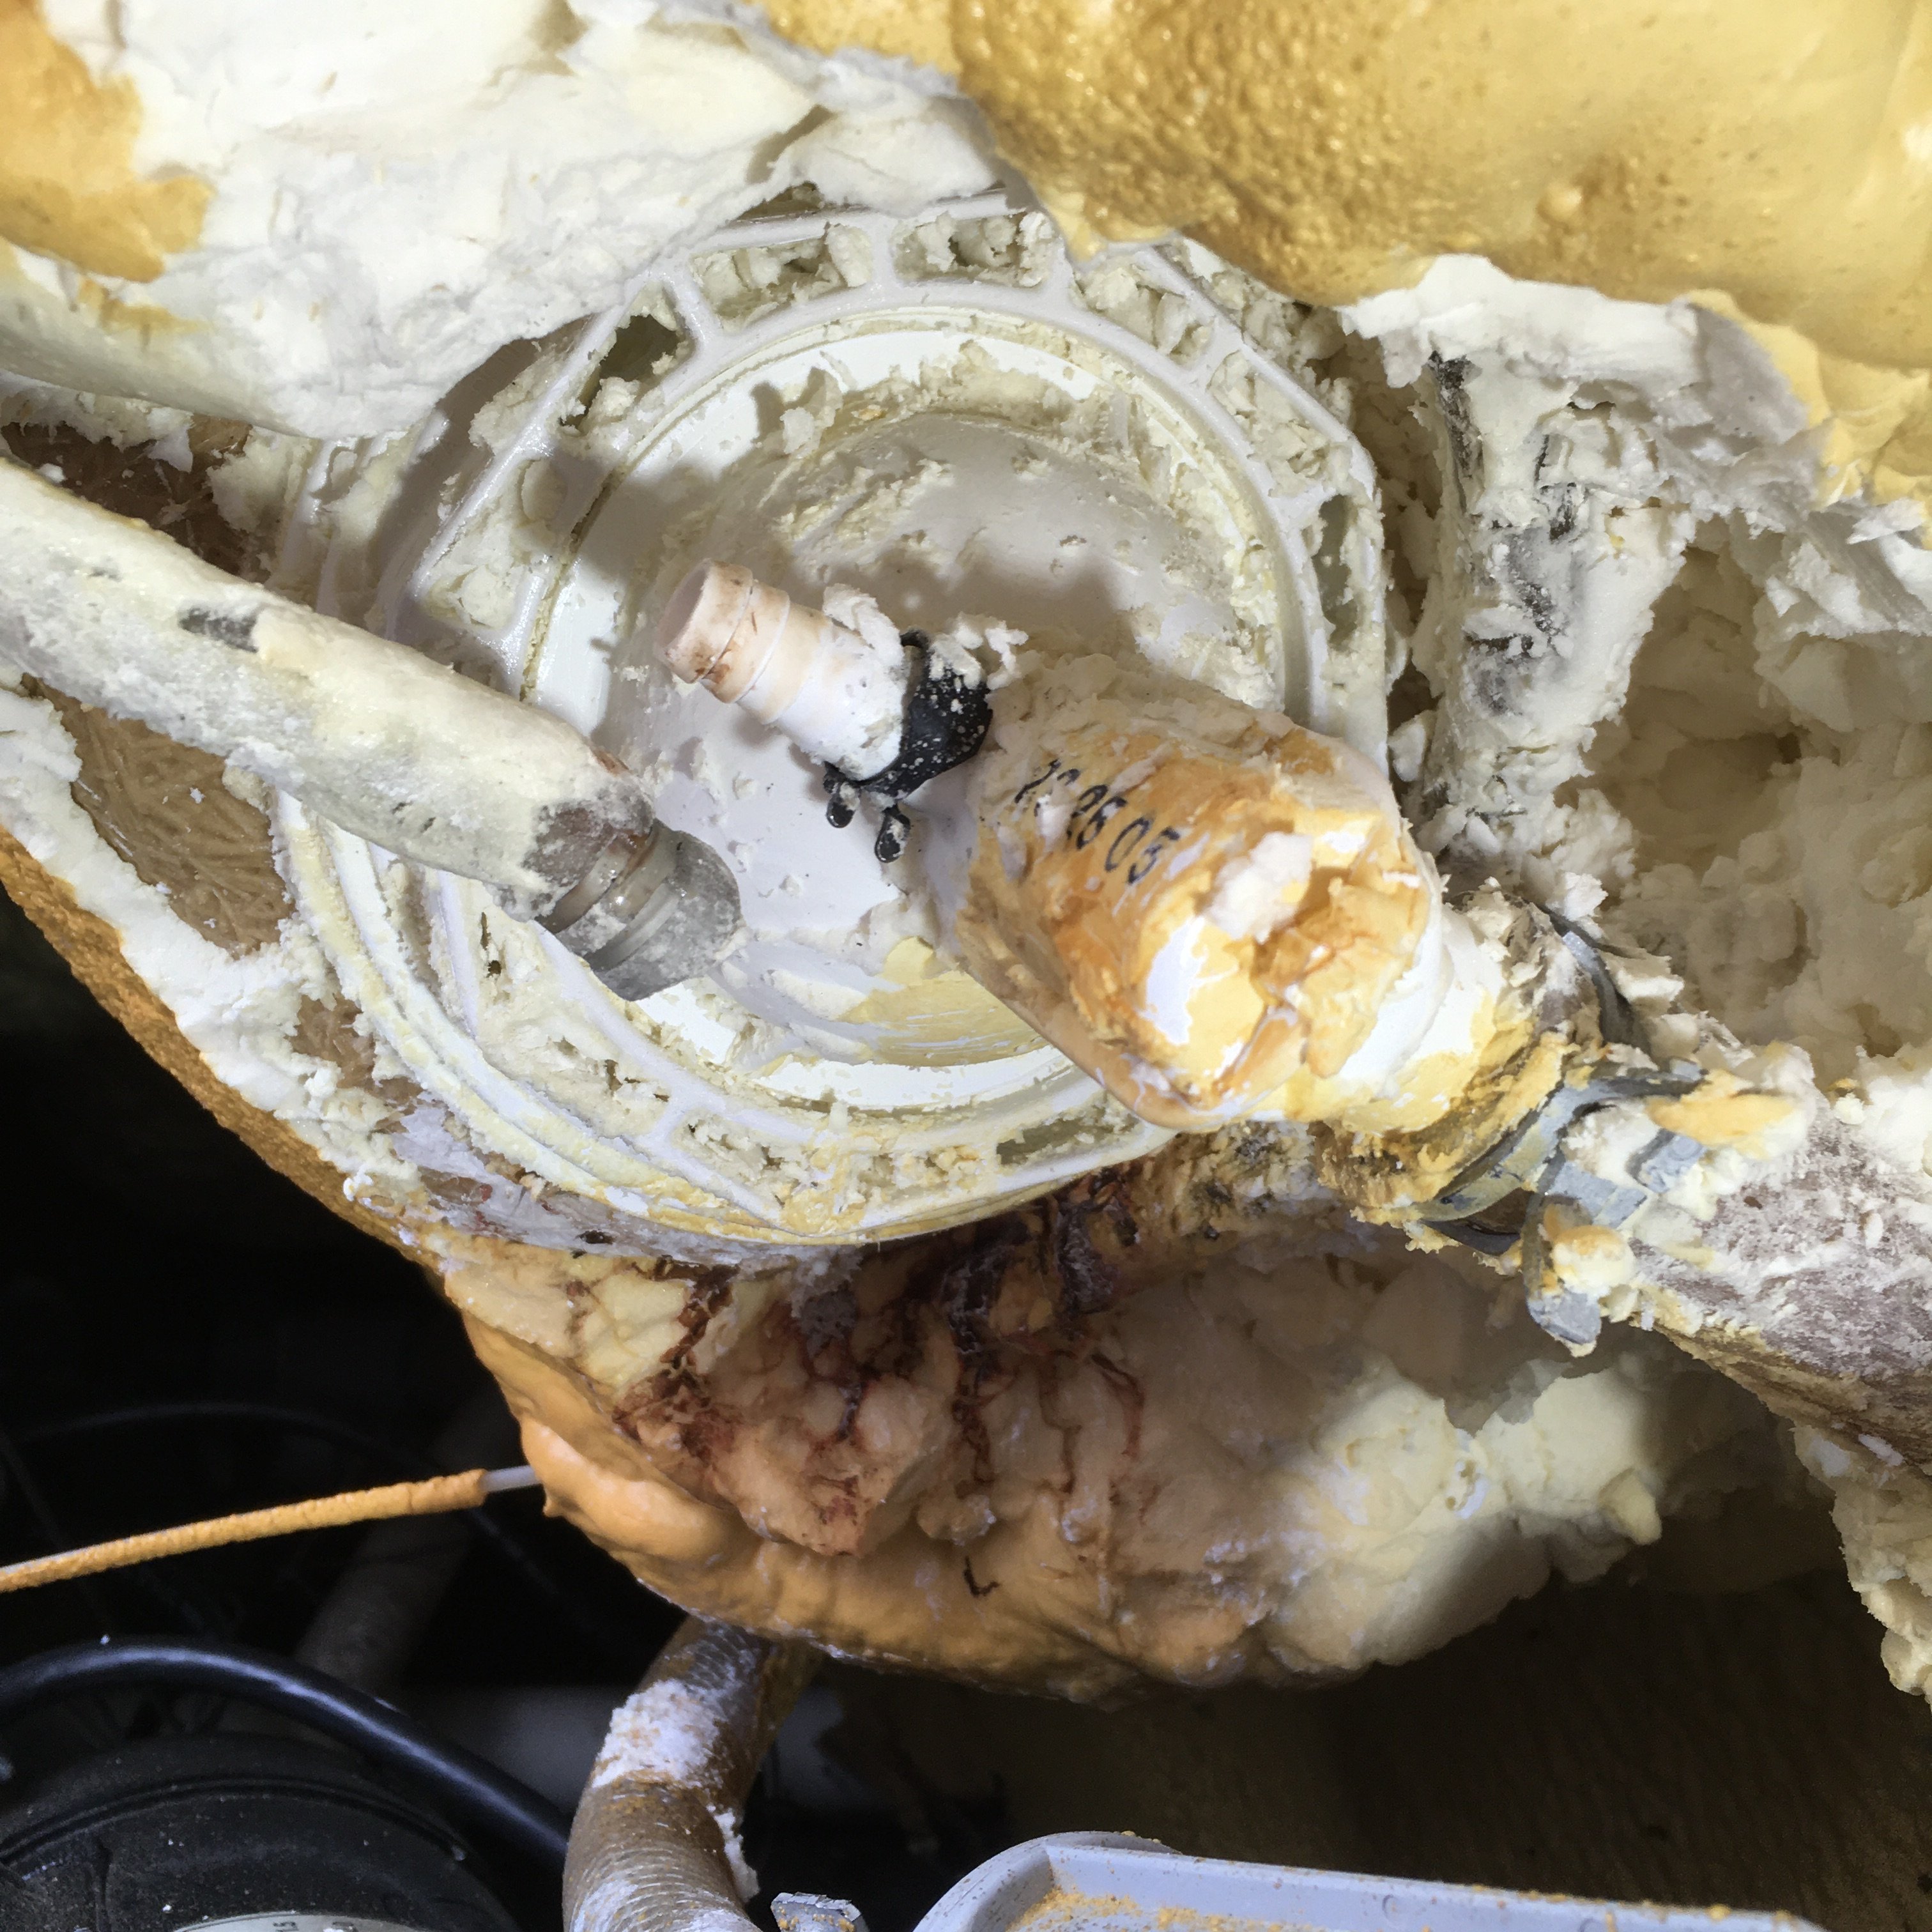
Leaky gasket (#5 in the diagram, I assume) forces the removal of the jet back. Any tips or instructions on how to remove #7, the big nut? Is there a special tool or is a small chain wrench the thing to use? Are parts even still available? Thanks

-
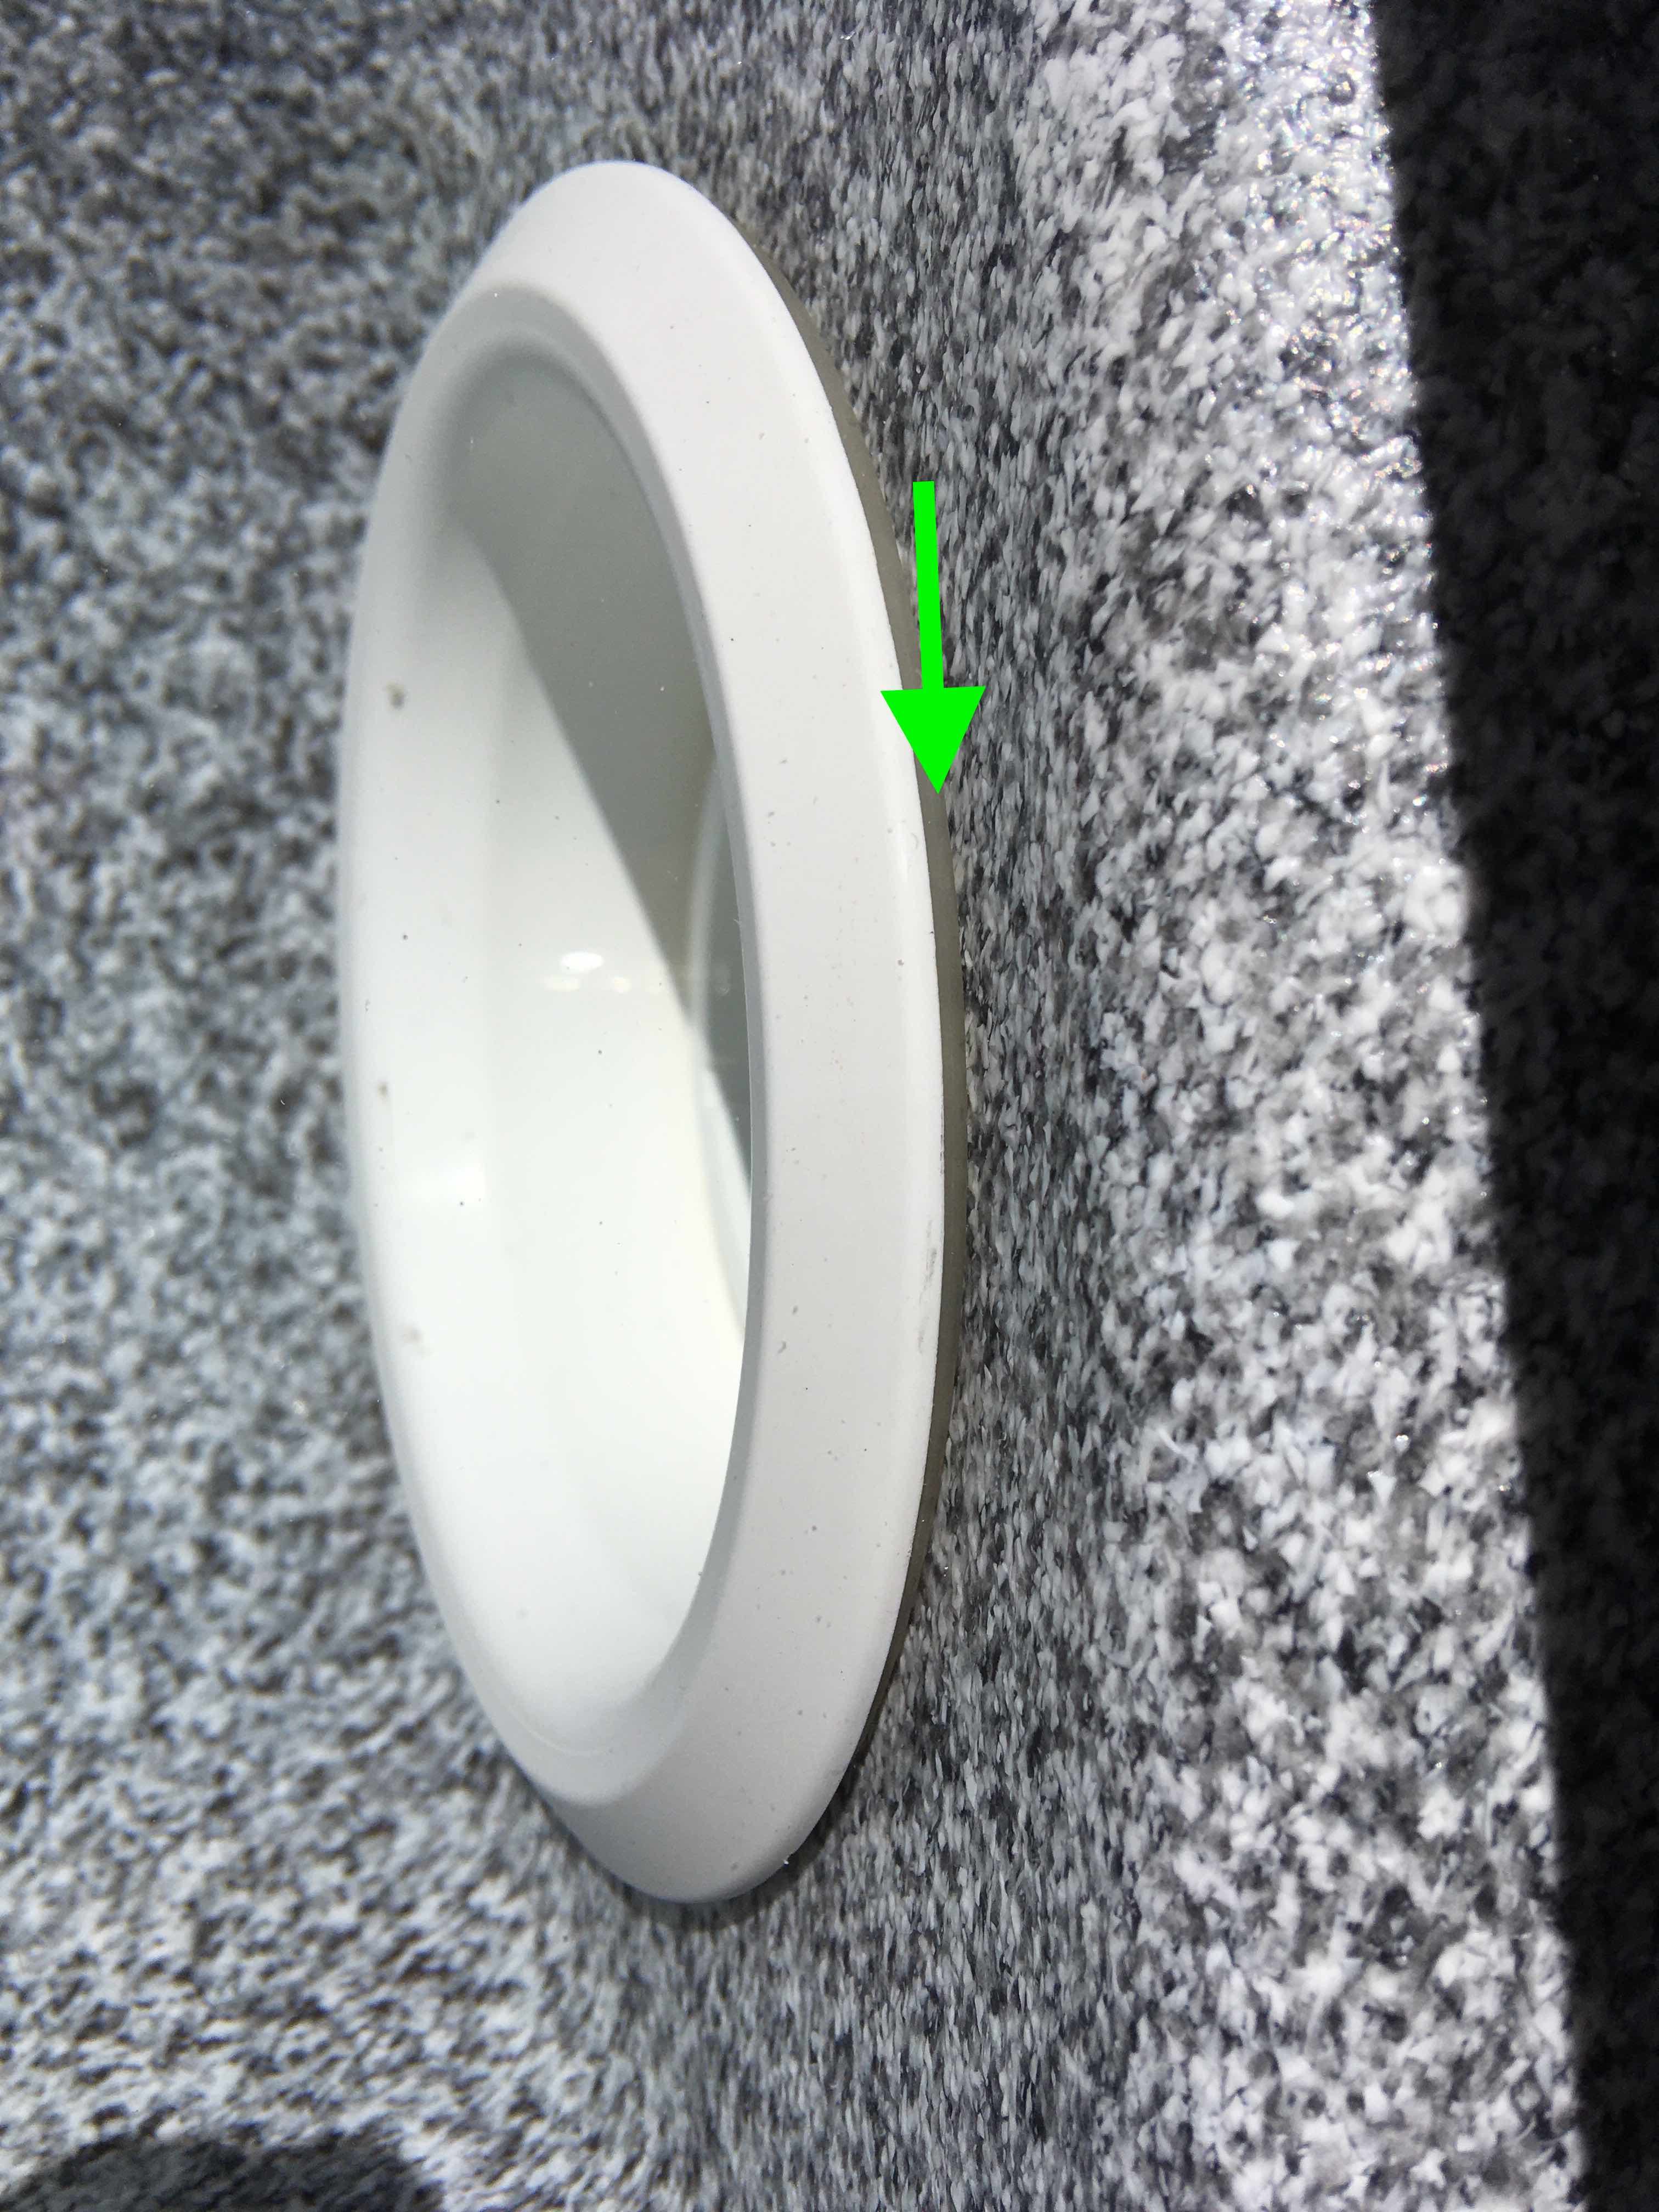
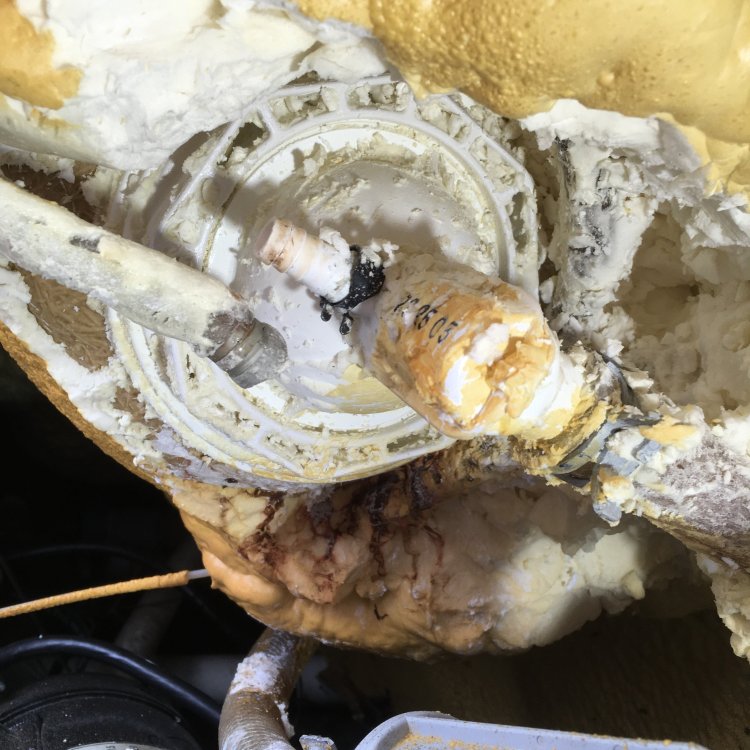
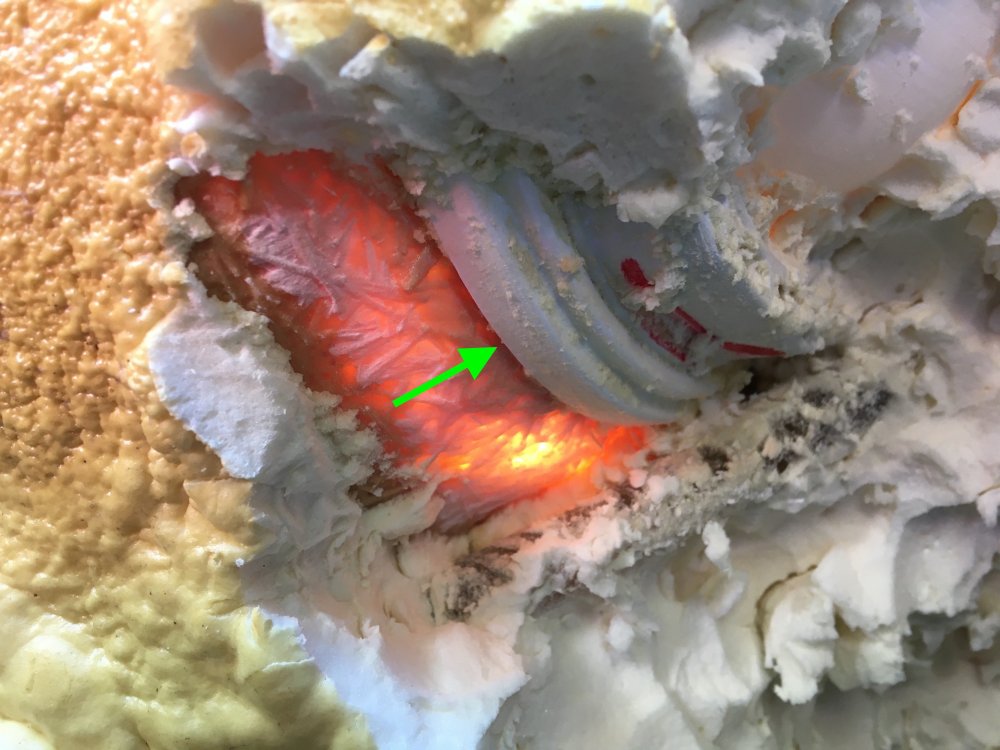
So I pulled the insulation away from the leak area on my Altamar and found the leak. I only ever saw one drop of water form where the arrow is but that has to be the location. The hot tub isn't on fire, that's how the sun looks coming through the shell! It leaks faster when the water is hot and swirling around. Obviously the gasket between the "inside" portion of the jet holder (or maybe it's just one piece) has gone bad. How do these go in the hole and is replacing them even possible? Are they available? Would I need a whole jet holder or just the gasket? I was thinking of just running a bead of clear RTV silicone around the gap between the jet holder and the spa body, on top of the leaky gasket (where the arrow is pointing) and calling it good. If I did a careful enough job you'd hardly see it. Would that seal it or am I making more of a mess for later when the jet holder actually has to come out? I'd probably just let this leak go and put a drip pan under it as it's very slow, except for the fact that it's right above the motor. Thanks for any advice. Val
-
2004 Sundance Altamar, leak inside of shell under filter.
valvashon replied to valvashon's topic in Portable Hot Tubs & Spas
I've purchased a Plast-Aid acrylic and PVC repair kit. Seemed to be the best thing out there as the shell is acrylic. Will post pictures and results next week. -
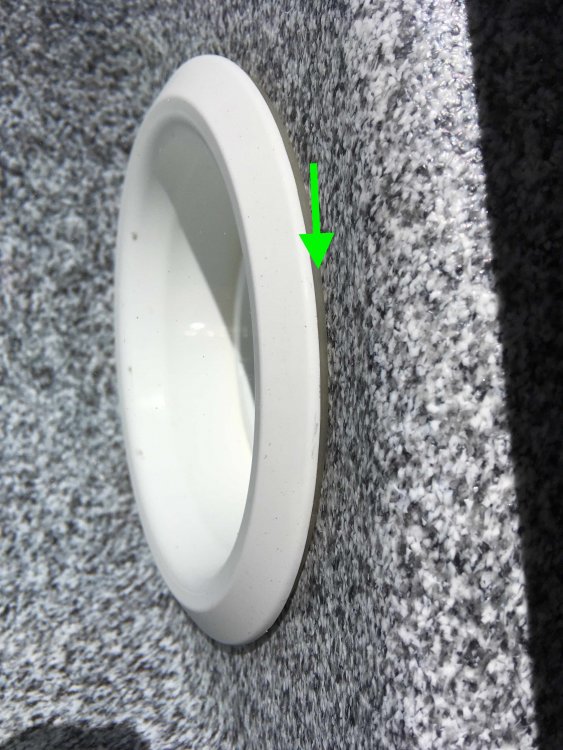
I do remember seeing this little chip in the "floor" under the filter in my Altamar in the past, but have not noticed a leak in the motor/control area until now. Either I was oblivious or the water has just worked it's way through the insulation now. Where the water is coming out over the motor is about a foot away (horizontally) from where this chip is so I believe that this is where the leak is from. Draining it now to just past the point of the bottom of the filter cavity and will check in a couple of days to see if the leak stops. If so I will do the blue food color/water thing and see if blue water drips down. If so, can anybody recommend a patch/sealant material for this? Doesn't have to look great as nobody ever sees this area unless the filter is out but it does have to seal perfectly. The chip is very small- no bigger than the inside circumference of a drinking straw. As I said, it's been there a while but I have no idea what caused it. I can't have water dripping on the newly rebuilt motor anymore!

-
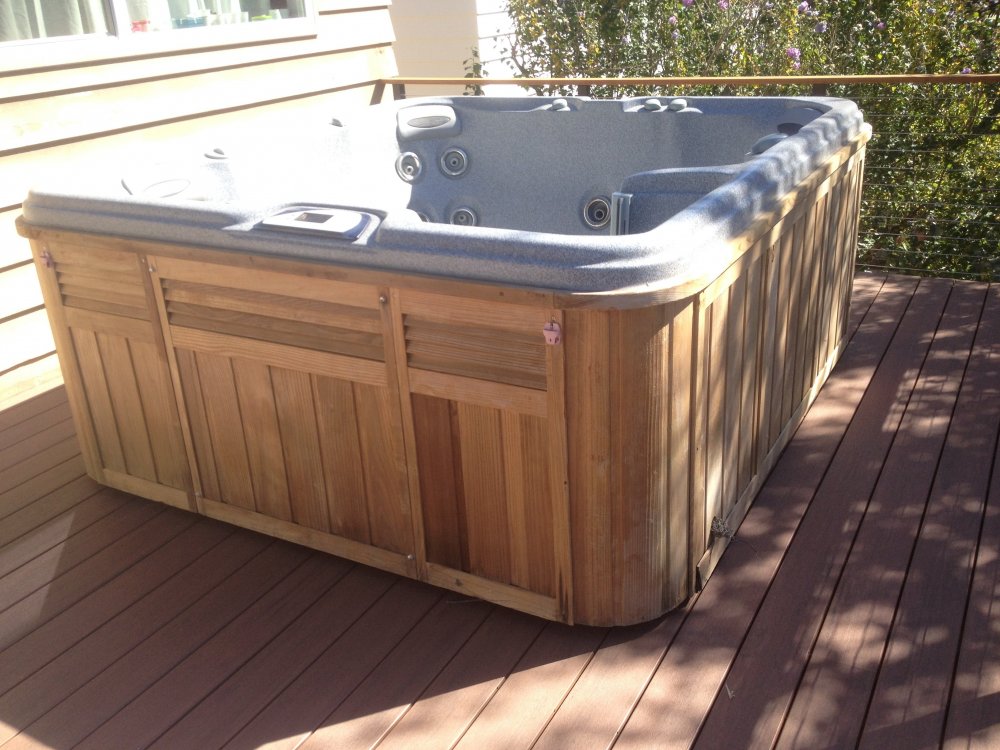
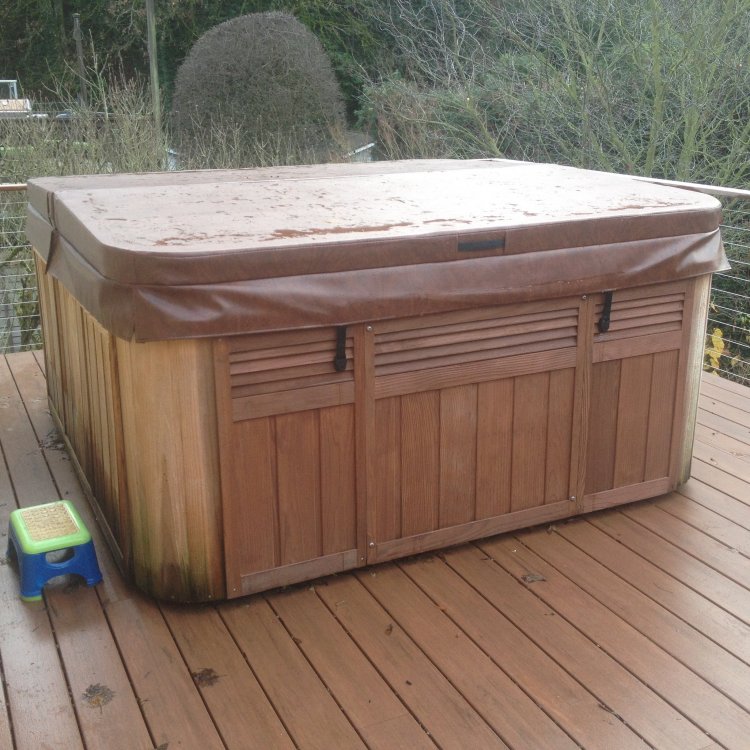
I had a pretty good experience with getting a new cover from a place in Florida. Could recommend them if that's OK here. Here is a picture of my 2004 Altamar with the new cover. I made the mistake of not properly specifying where the straps should be but I came up with a workaround. And yes, I'm still working on staining the outside of it properly.
-
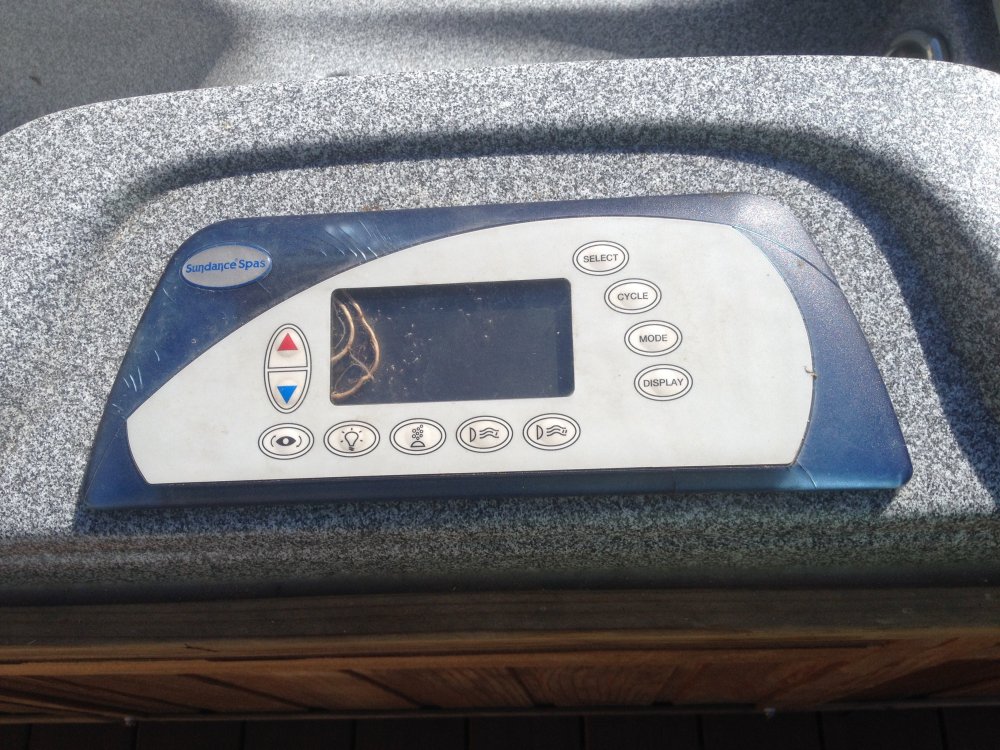
2005 Sundance Altamar- how to pull control panels up?
valvashon replied to valvashon's topic in Portable Hot Tubs & Spas
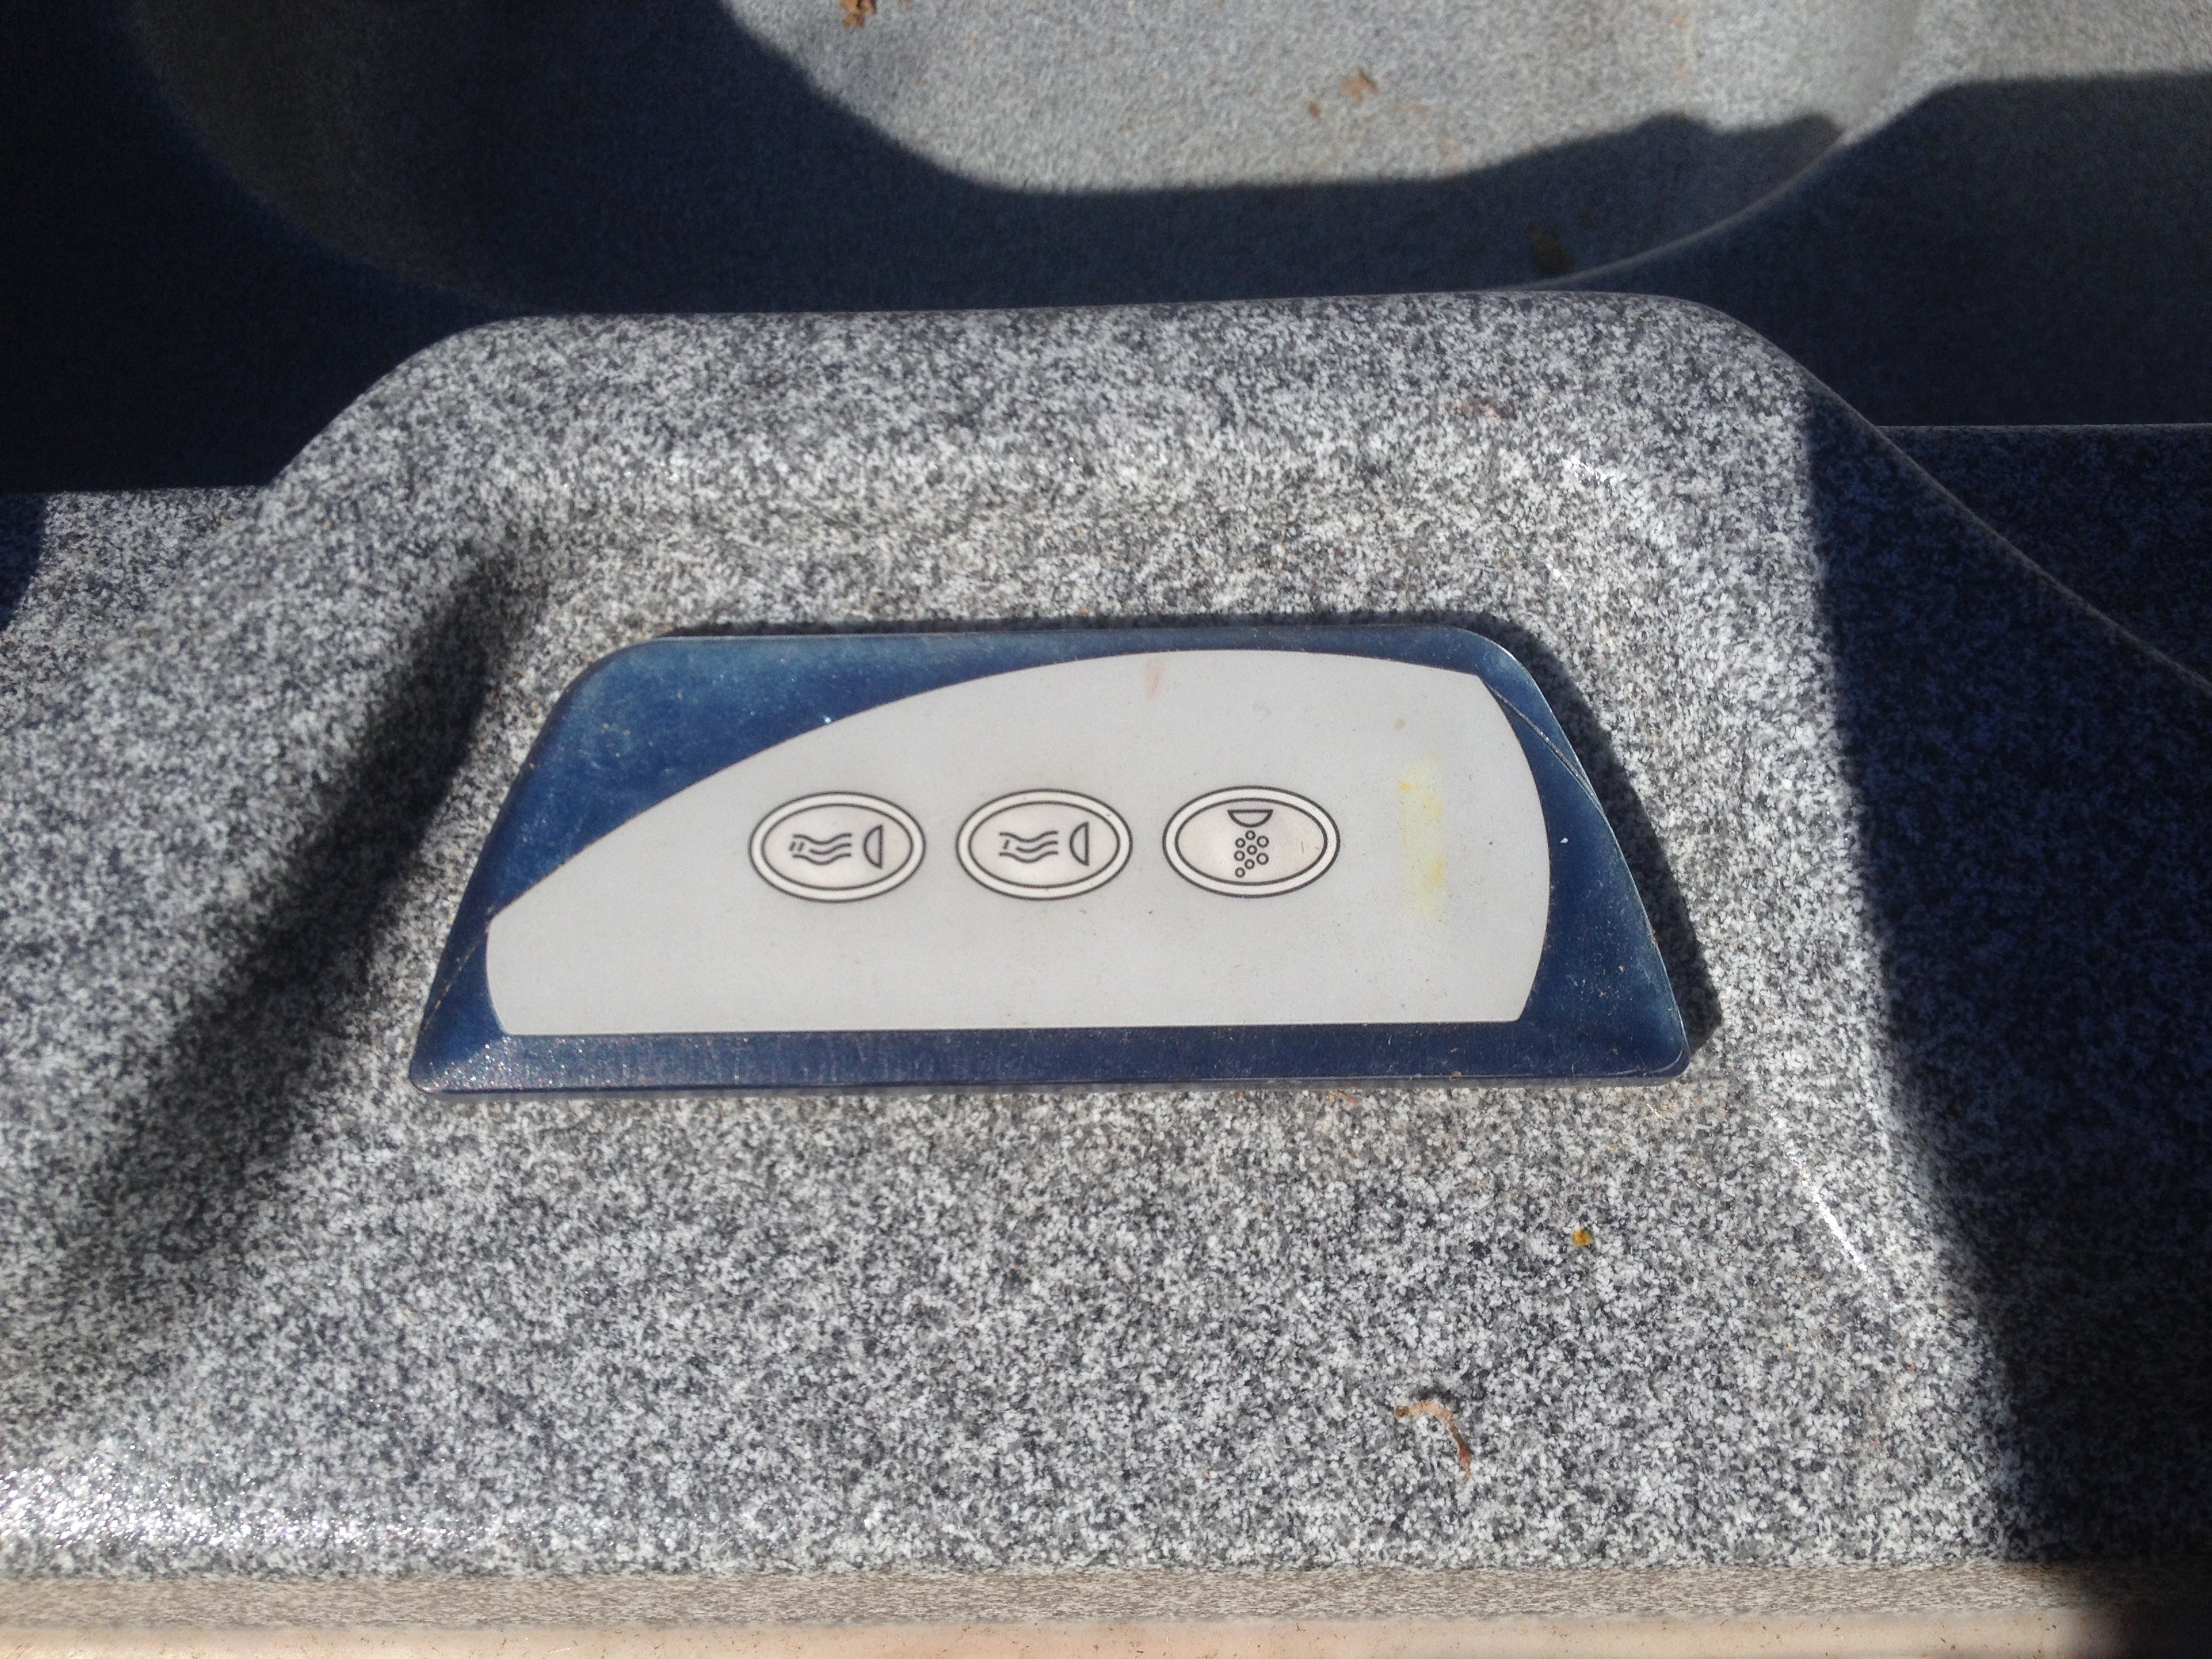
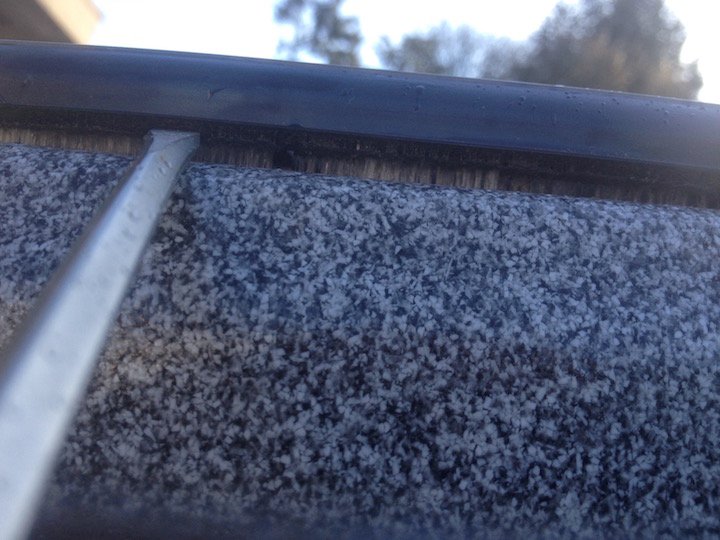
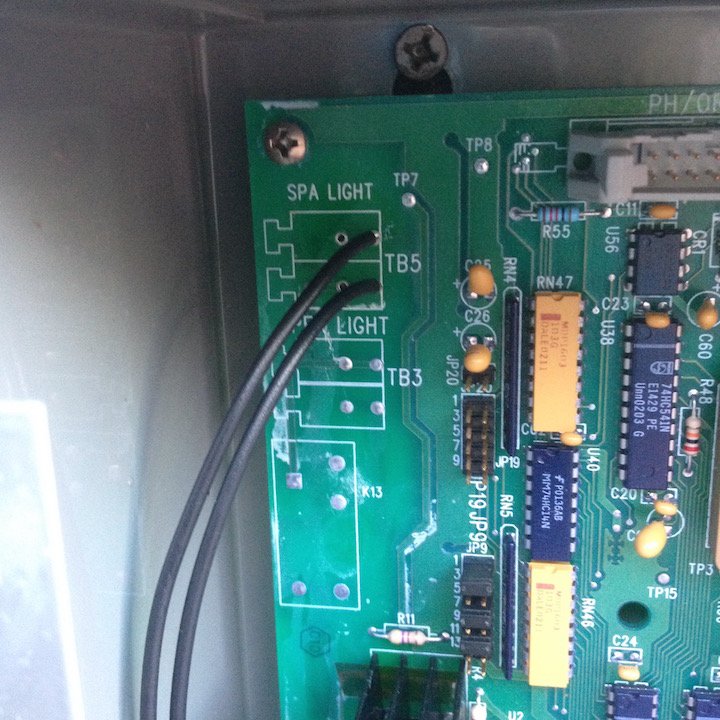
The fun continues with this one. The rebuilt motor had to be reworked as it started just "buzzing" when power was applied. I had to pull it out and take it back to the rebuilder. It was well out of warranty as it sat in my basement for a year after the first time I brought it in. They did some work including a new start capacitor and it was less than the first time so I guess I'm OK with it. The cleaning continues and we should be able to get into it later in the week! I had the light assembly out in an effort to try to upgrade to a color changing LED but couldn't find anything suitable. Went to reassemble everything and ended up breaking off one of the lever tabs on these terrible WAGO 255 connectors. Couldn't get the connector to open after the lever broke off so I just ended up soldering the wires directly to the circuit board (I use a soldering iron almost daily in my job so this was a natural choice). Some research turned up what appear to be an improved connector with larger lever paddles which might make it easier to push. If I ever end up placing a Newark order I may get one of the improved ones and replacing it. Also, see picture of screwdriver prying up the control panel. I looked underneath and also put a scope camera inside of the cavity where the control panel lives. There is nothing coming down into the hot tub body from the panel so on this model it really appears that they are held down with some quite strong double stick tape.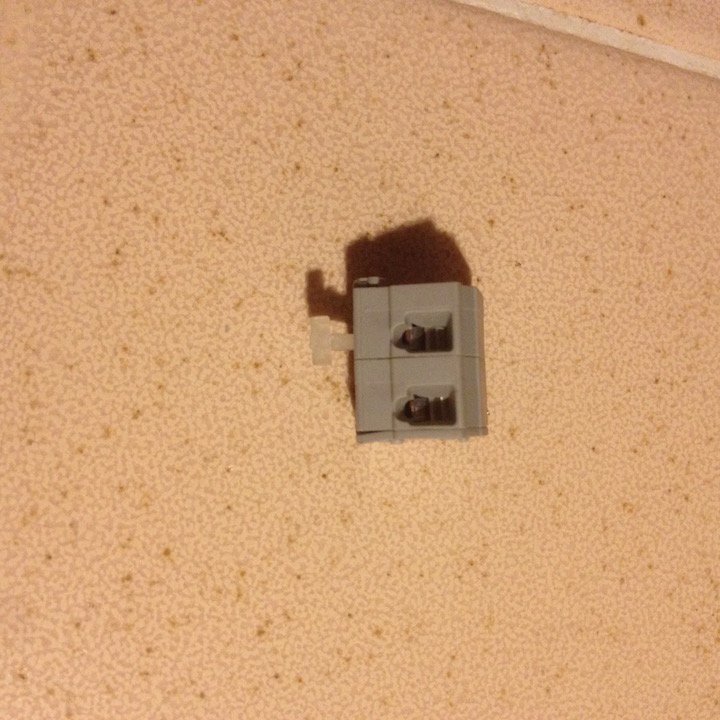
-
2005 Sundance Altamar- how to pull control panels up?
valvashon replied to valvashon's topic in Portable Hot Tubs & Spas
As a followup- the electricity was finally run to the hot tub today and I finished filling it with water. Flipped the breaker and- Jets! More jets! Heat! Circulation pump! The bubbleator! Everything on this tub seems to work after sitting for 7+ years (except for the small control panel, which wasn't working before). I still haven't pulled the control panels up- I tried prying but I felt too much resistance. I re-read the posts and saw that I should loosen up some of the spray insulation from underneath first, so I will try that once I get the tub cleaned with spa purge and drained. My newly rebuilt motor does have a slight chirp at the slow speed so I will be inquiring with the rebuild place about that. And I occasionally get a FLO and or CIRC error as I'm switching modes but they never stay on and everything is working as it should. Here is how it sits today. I have done the center sections (and will do the rest) with Benjamin Moore Arborcoat Semi-Transparent Leather Saddle Brown. It's a little dark but the wood surround was in terrible shape so this should help hide the sins a little bit. Plus at night it disappears into the deck and you can't even see it sitting there from the sidewalk. Made a little error when ordering the new cover and the straps ended up in the middle but I figured out a way to attach the holders.
-
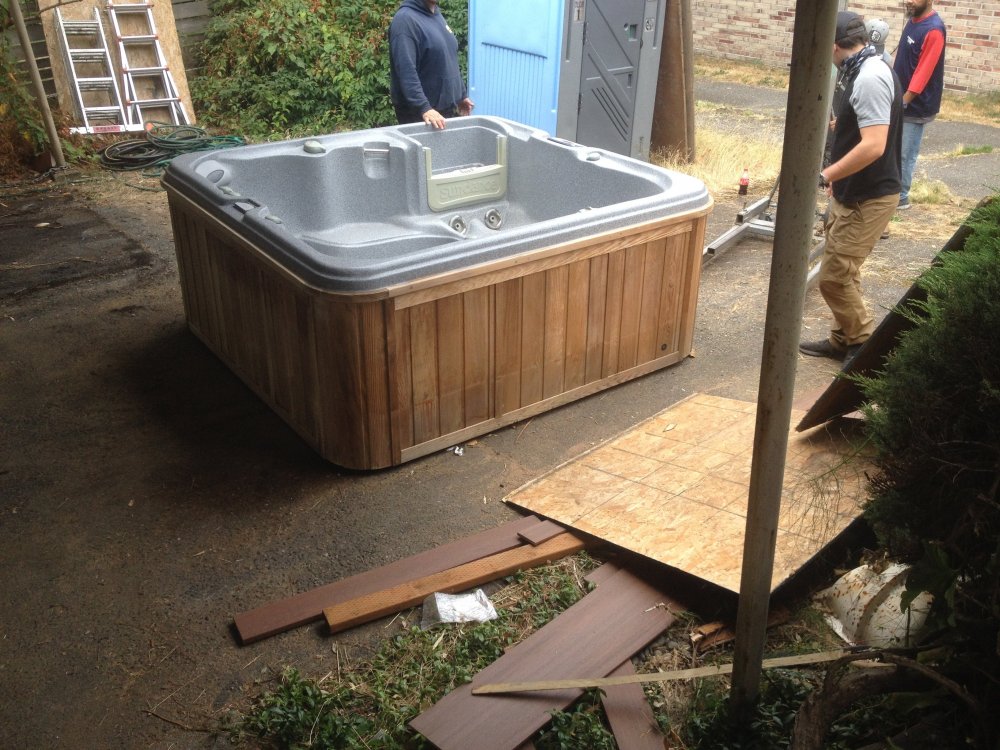
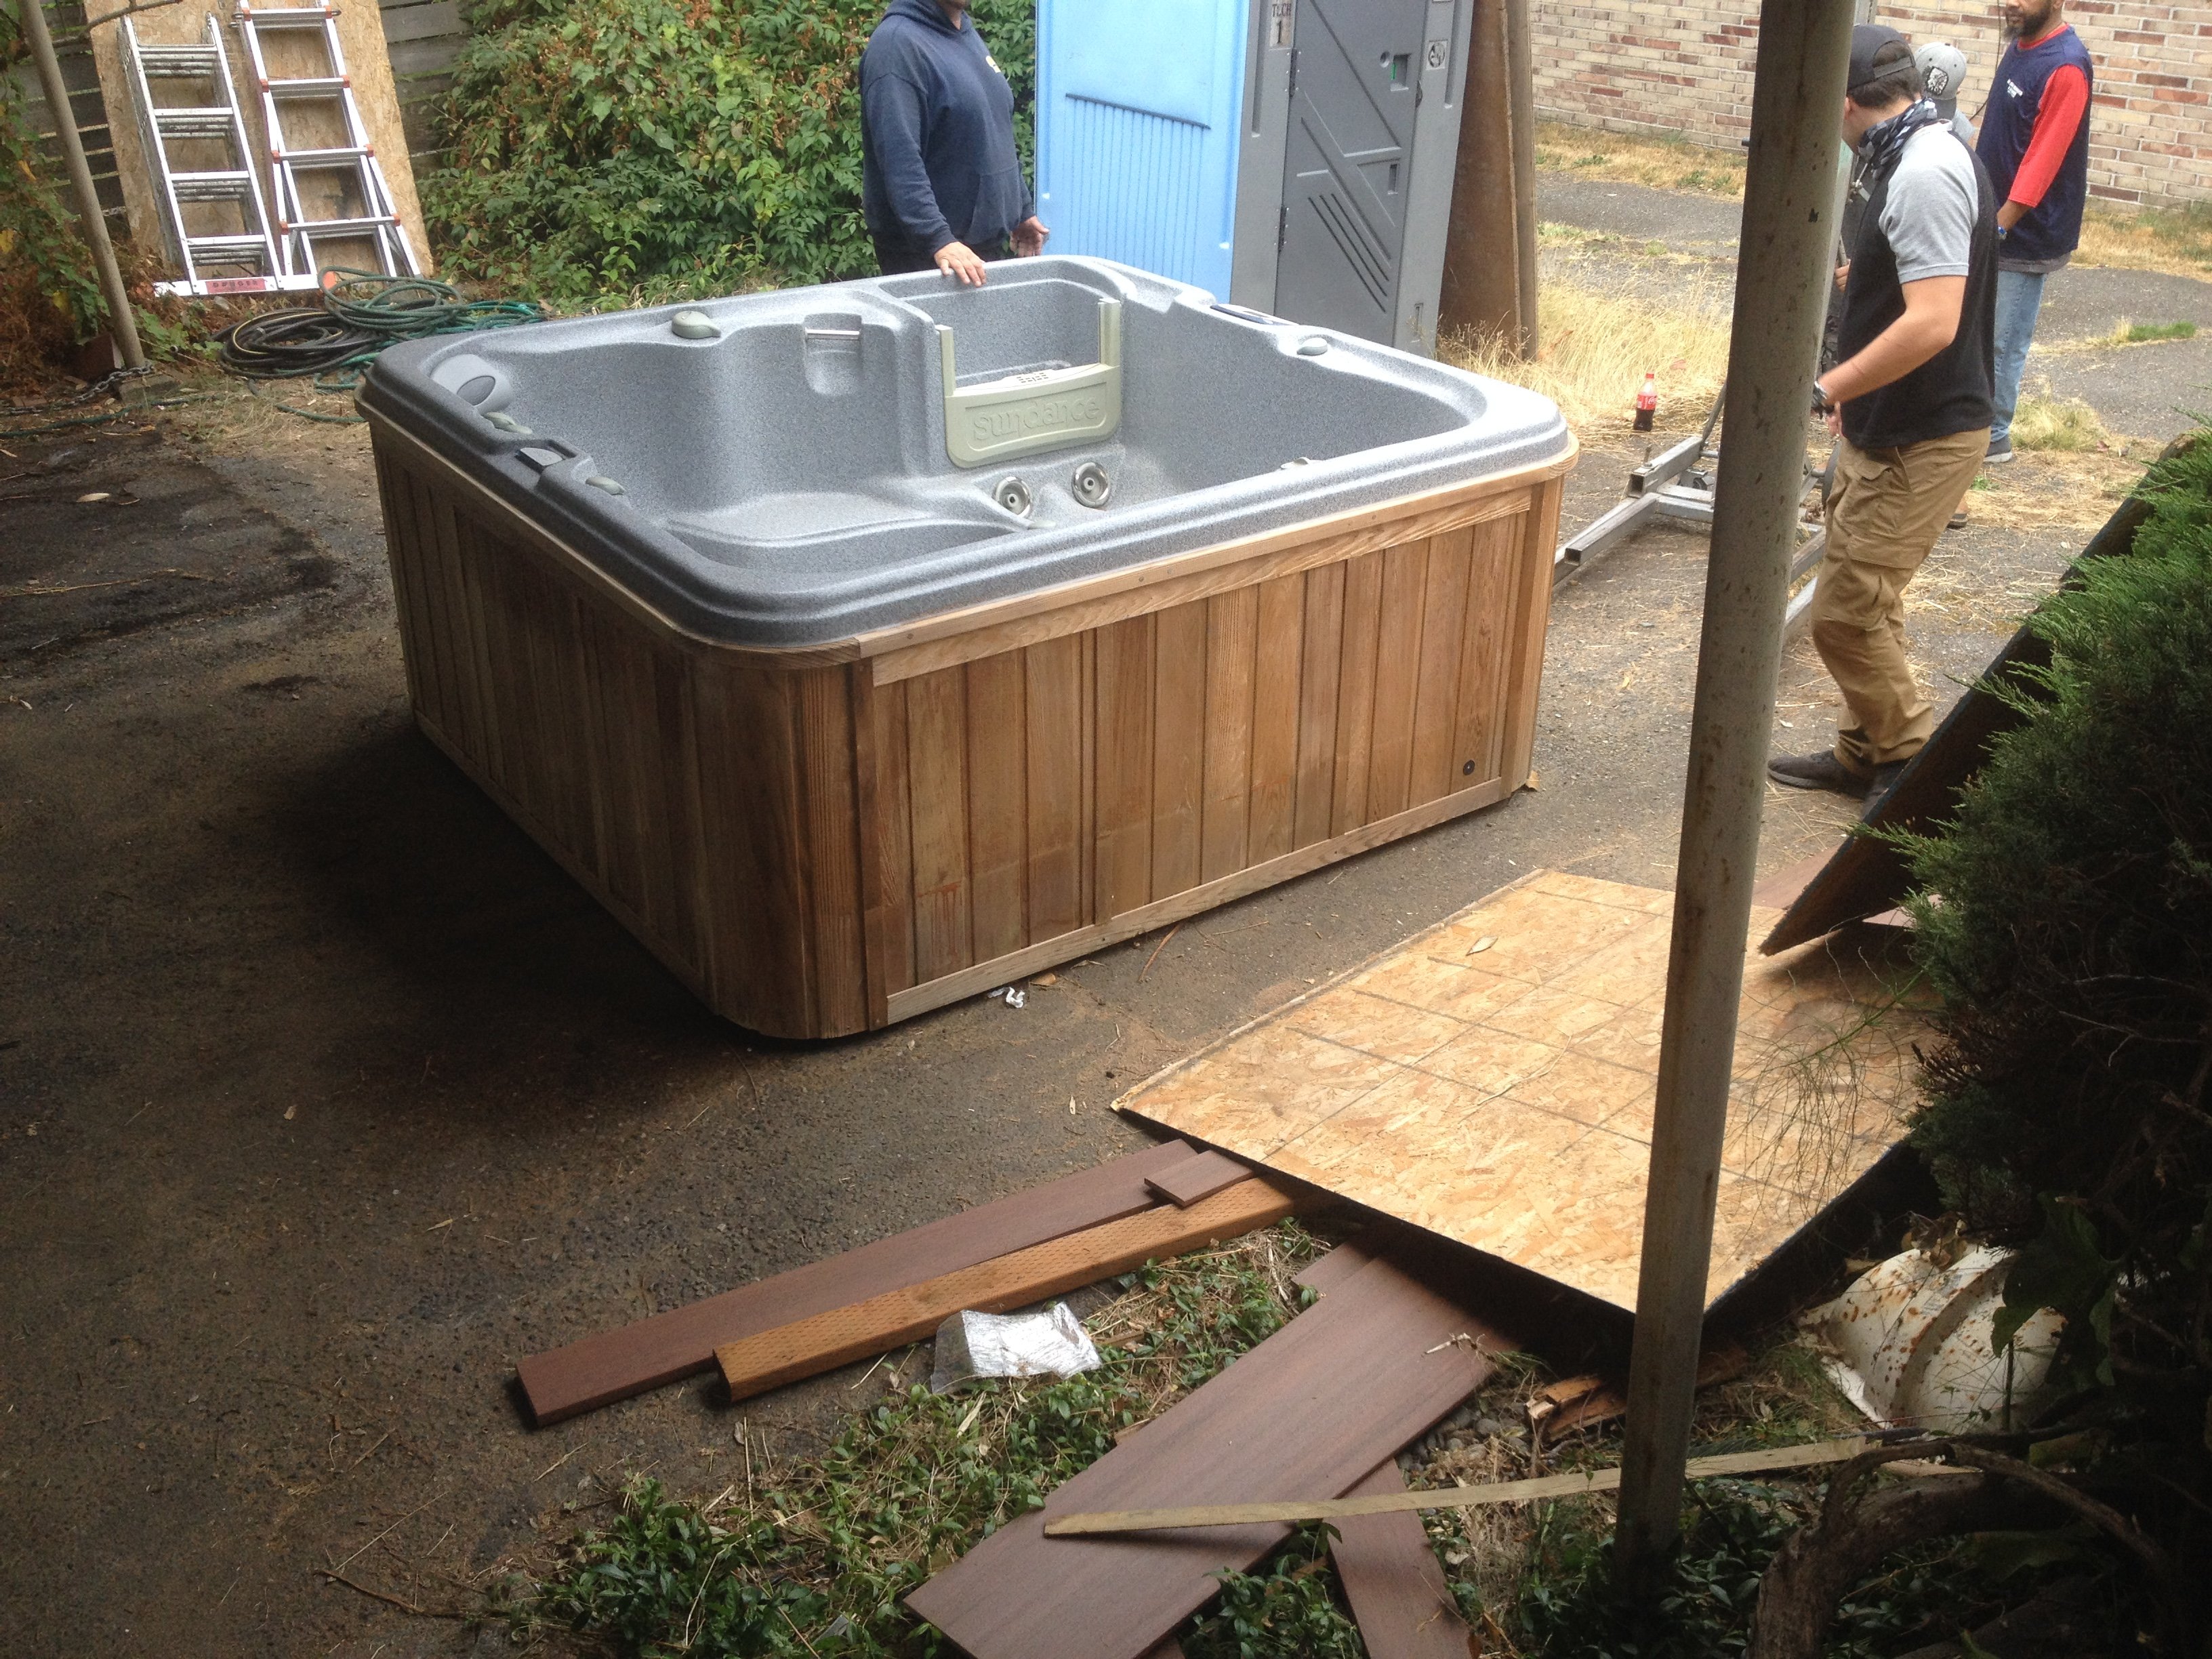
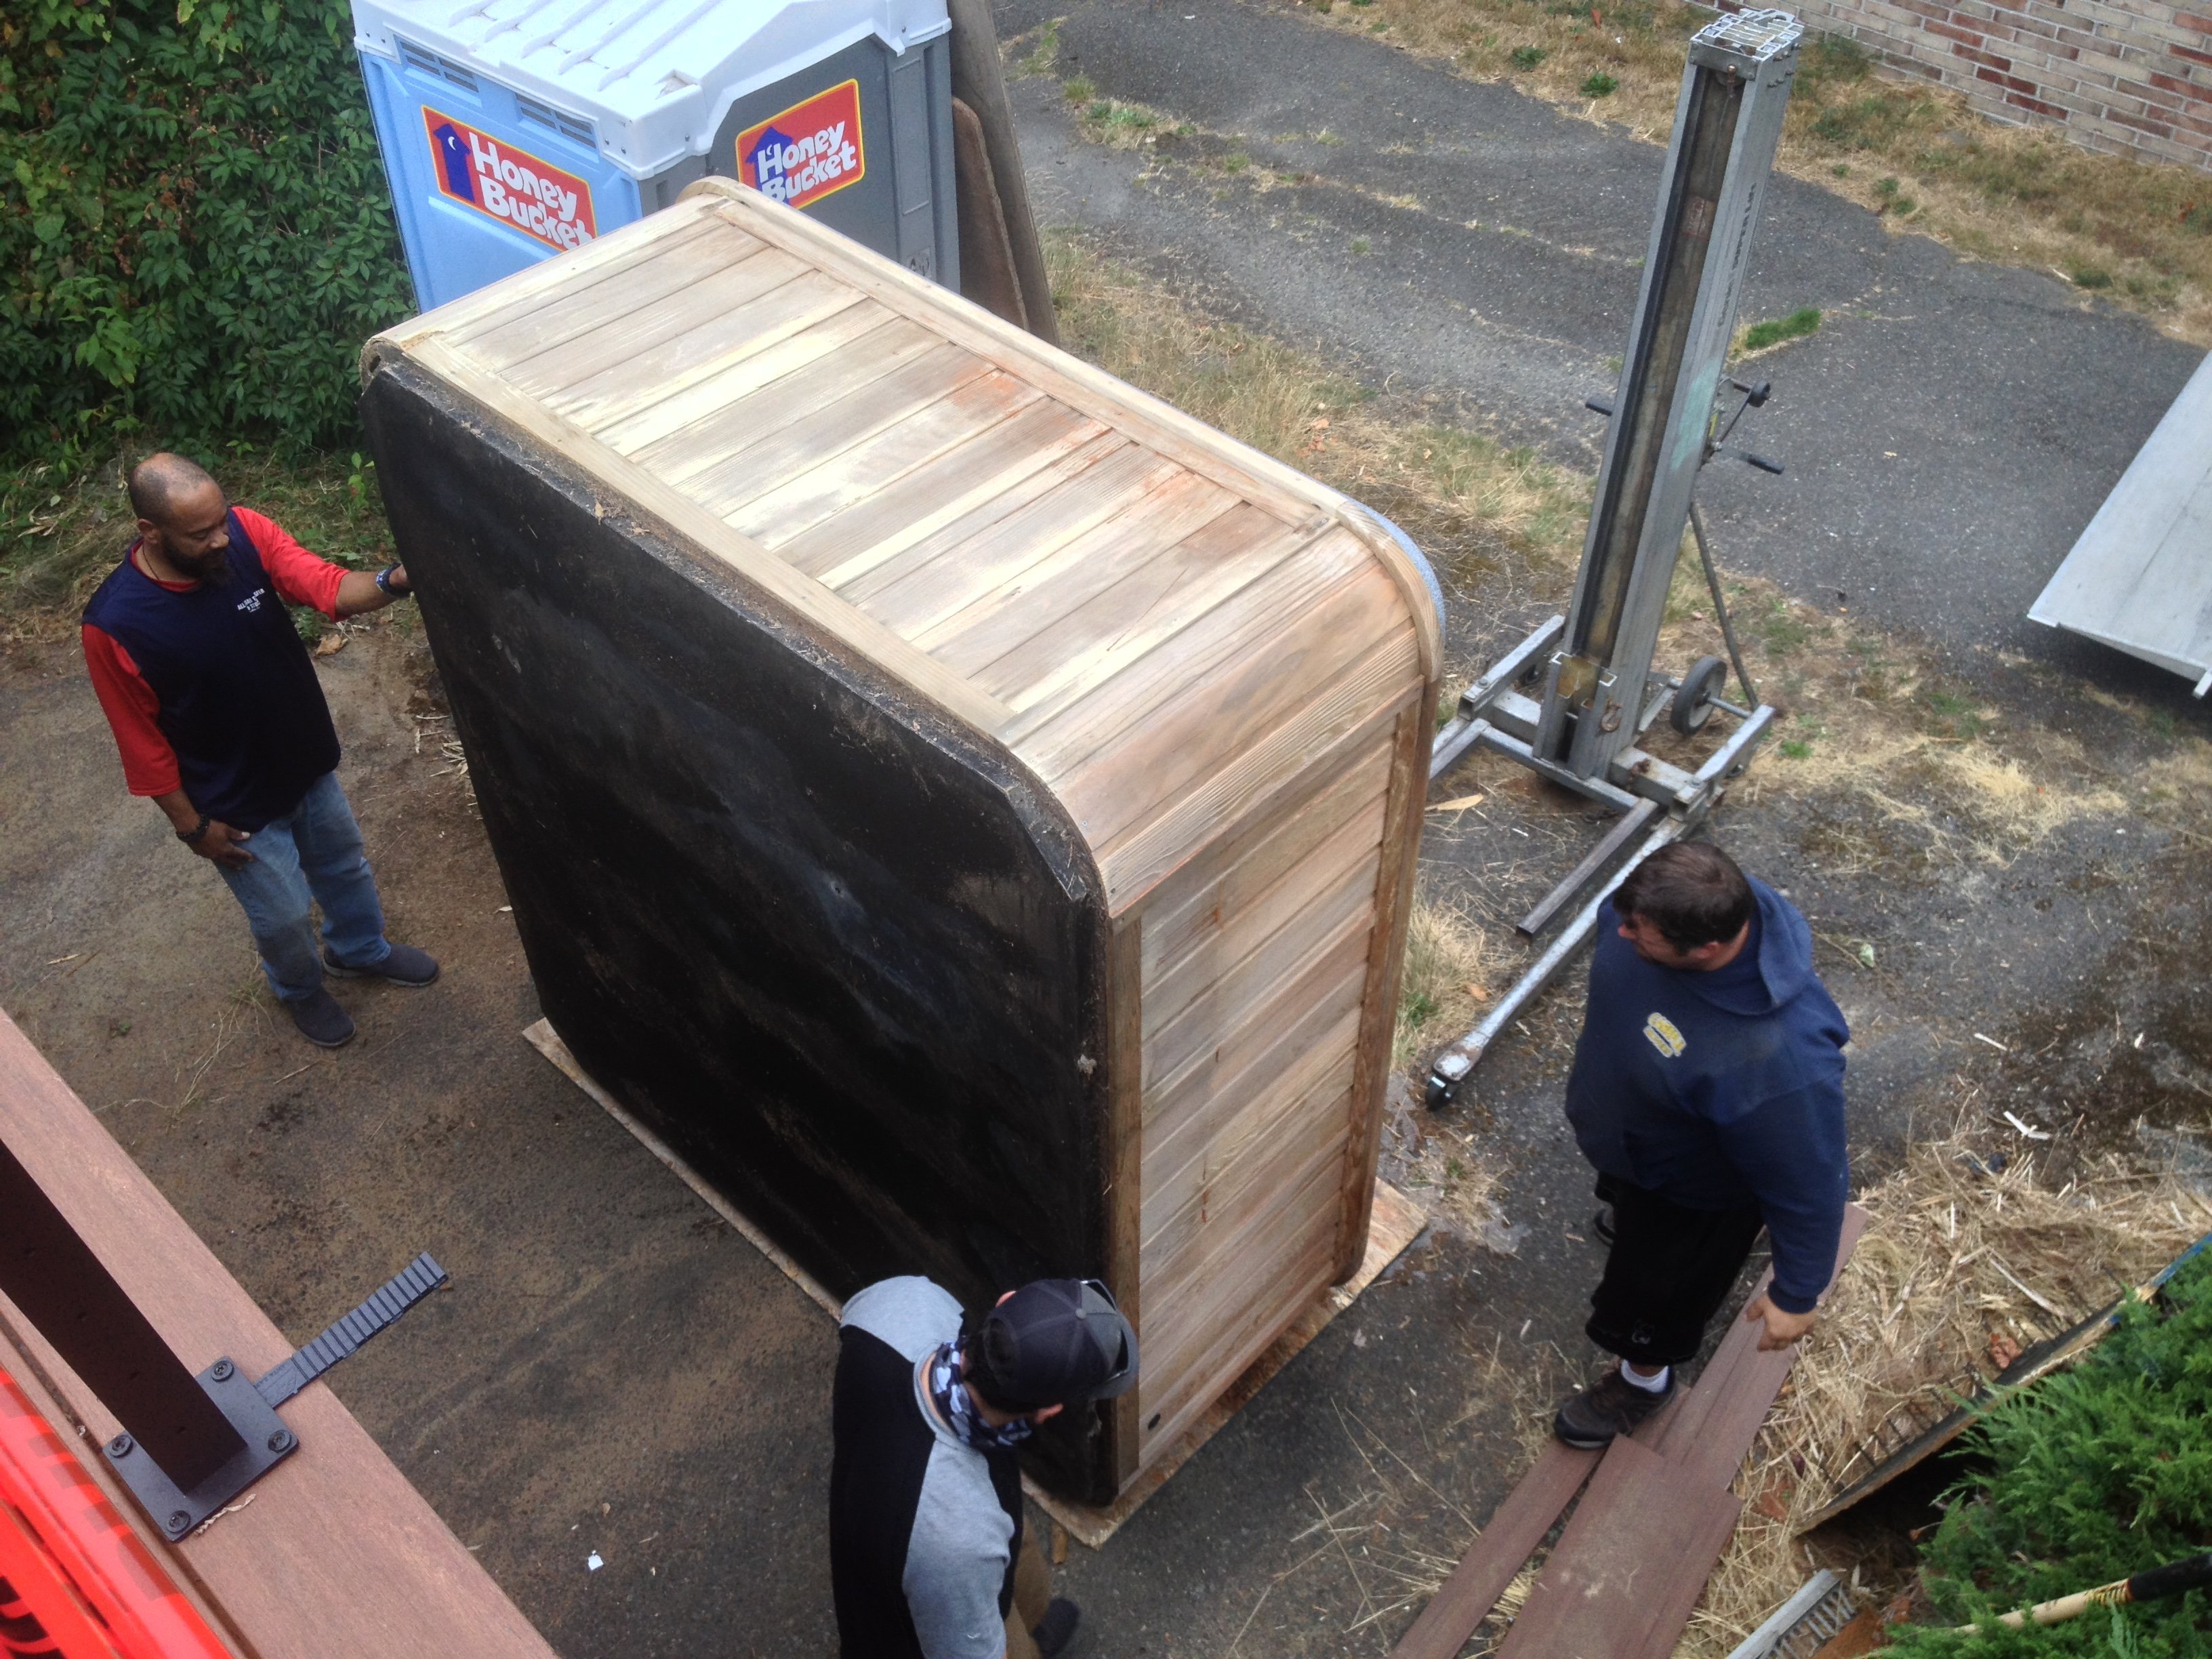
Sundance Altamar, one owner. Installed in 2005 at our previous house. By the time we were ready to move in 2014 the small control panel had stopped responding and just before we were going to list the two speed (?) pump had developed a bearing noise. I pulled the pump meaning to have it rebuilt (there's a good shop in Tacoma, WA) but getting the house ready took precedence. We had the hot tub moved to our current house and set down on the driveway under the existing deck. Plan was to rebuild the deck to hold the hot tub. Plan came to fruition this year. Poor Altamar sat on the driveway neglected and ignored for about 7 years. I did little save for making sure to put a couple of heat lamps in the surround during the few below freezing days we have here in Seattle. It's now cleaned up inside (mostly) and out, waiting on some work on the surround wood and a good stain and seal. I did get the motor/pump rebuilt and it does hold water with seemingly no leaks. We are looking forward to using it (after a deep clean inside!) after we get the electricity run to it. I do need to pull the control panels up and off for obvious reasons- the small one doesn't work and the large one had some Morning Glory grow through it (I'm a bad person). I've had a cursory look but can't really tell how these pull up and off. Any suggestions? Thanks- Val I also included two of moving day; one of it on the driveway and one about to be lifted up on the deck. FYI deck has been structurally engineered to hold weight of hot tub and occupants.